
![[Valid RSS]](/valid-rss.png "Validate my RSS feed")
OpenBSD now includes an in-kernel WireGuard implementation wg(4).
Well, the WireGuard VPN protocol has been available on OpenBSD as a port for a while; Puffy has actually had user-land support for WireGuard using WireGuard-go, an implementation in Go, and later as the wiresep port in C, -both using tun devices-, which incurs a slight penalty for crossing the kernel/userspace border for each packet, much like OpenVPN and others.
Since OpenBSD version 6.8, WireGuard being in-kernel, comes installed by default, brings an implementation way much faster. It also means we can skip using extra software and use base-only utilities for a very simple, easy configuration.
So, obviously for this write-up we’ll need -at least- version 6.8 of OpenBSD installed. And after OpenBSD 6.8 installation is done, using the newly released in-kernel wg(4) driver with only base utilities, we’ll implement a very secure, fast and stable VPN server for any OpenBSD/MacOS/Linux/Windows clients.
Our VPN server will be OpenBSD, and as for the client, I’ll go with Windows 10 Enterprise LTSC 2019 (Long Term Servicing Channel) in this write-up of mine. What is a Windows 10 LTSC?
-An “OpenBSD VPN Server+Windows Client” thing was asked by lots of people around Internet forums, as well.-
Windows 10 LTSC (no default MS bloatware/malware installed), is one of the most stable operating systems Microsoft has ever introduced, imho.
A clean Windows edition, that comes without any ads, bloatware or spyware. The Start Menu is not full of garbage.
–It’s clean (no pre-installed non-removable junk “apps” and no ads),
–It’s resource efficient (no Cortana and other background processes),
–It’s stable (no feature updates to break your computer – just security and bug fixes for 10 years).
It’s weird that, it’s not actively advertised/known.
(My all-time-MS-favourite is: Windows 2000 (a.k.a. NT 5.0 — ssshhh, I’m a bit old). And while we’re at it; Windows ME/Vista/8/8.1 were crap)
You can download Windows 10 LTSC ISO images under my “Random Files Archive” link.
Anyway.
A lil bit further digging into WireGuard;
–Wireguard is an extremely simple yet fast and modern VPN that utilizes state-of-the-art cryptography, and easier to audit since it is less than 4,000 lines of code, and is quite easy to use. It aims to be faster, simpler, leaner, and more useful than IPsec, while avoiding the massive headache. It intends to be considerably more performant than OpenVPN.
–WireGuard is not only the fastest VPN on the block, but the cryptography has also been formally verified, which means there are mathematical proofs that its cryptographic constructs are secure in the symbolic model. See: https://www.wireguard.com/formal-verification/
–WireGuard is a next-generation layer3 VPN tunnel that can be run in passive mode, only sending packets when something needs to reach the other side (unless you enable heartbeats). A great benefit and opportunity for mobile phones because it was developed as a “stealth VPN” by default, not sending any packets unless there is actual data to be sent. This brings an another good advantage; not draining the battery, like other VPN clients usually and commonly do.
–Additionally, it allows roaming freely between different IP addresses, meaning you can transition between WiFi and cellular connections, or between any other kinds of connections, without having to establish any connections; it’s entirely seamless.
–WireGuard only allows selected modern crypto algorithms and hashes, chosen to be performant on CPUs which lack crypto accelerators, while still being secure.
–WireGuard packets are sent over UDP, and can run over and transport both IPv4 and IPv6, running over UDP.
–It handles NAT/port redirects and endpoints changing IP addresses, which is very nice when changing from wired to Wifi or vice-versa.
–WireGuard is designed as a general purpose VPN for running on embedded interfaces and super computers alike, fit for many different circumstances.
Alright!
Here’s my setup;
Secure VPN Server: OpenBSD 6.8
Client: Windows 10 LTSC
The VPN server (Which is a tiny VPS) will have a *local* virtual IP of: 10.0.0.1,
has external/real outside-IP of: 45.54.45.54, and WireGuard will run on port 443 (UDP).
The port number can be arbitrarily chosen, however, port 443 is much safer while being seldomly firewalled on public networks, like schools, hotels, public transport networks.
I will use 10.0.0.2-10.0.0.254 as the VPN address ranges. 10.0.0.2 will be Windows client’s *local* tunnel IP.
Let’s start.
OpenBSD Server side:
Generate an end point private key with openssl binary:
obsdvpnbox# openssl rand -base64 32
yeByT72BY3pqv2xrYSJmHfRK6yNshKX3CiigOEJ8cbM=
WireGuard uses a Curve25519 key that is 32 bytes in length and base64 encoded. yeByT72BY3pqv2xrYSJmHfRK6yNshKX3CiigOEJ8cbM= is our server’s private key that’ll be used inside hostname.wg0 file.
Edit/create /etc/hostname.wg0 file and add the following lines in it (that creates WireGuard’s virtual NIC interface –wg0 – on the system):
inet 10.0.0.1 255.255.255.0
wgkey yeByT72BY3pqv2xrYSJmHfRK6yNshKX3CiigOEJ8cbM=
wgport 443
wgpeer GUyvXnVDp4Cu/OgV/sMEyk1eL7613xPBCAdZYxZPvz8= wgaip 10.0.0.2/32
up
10.0.0.1: IP address of our OpenBSD VPN virtual ethernet interface. 255.255.255.0 is its subnet mask. 443 is the UDP port WireGuard will listen.
Note that there is a “wgpeer” key:
GUyvXnVDp4Cu/OgV/sMEyk1eL7613xPBCAdZYxZPvz8= – this key is Public key of WireGuard client on Windows I already have set before. And wgaip which is 10.0.0.2 is going to be the virtual/local IP of Windows client. But how did I get that key? (You shouldn’t really use these keys, use your own ones, see below)
Windows client side:
Install WireGuard for Windows from the link: https://download.wireguard.com/windows-client/wireguard-installer.exe
Installation is quite straightforward. (Windows 10 has built-in VPN client, I prefer WireGuard’s tool, for the sake of stability and deeper details)
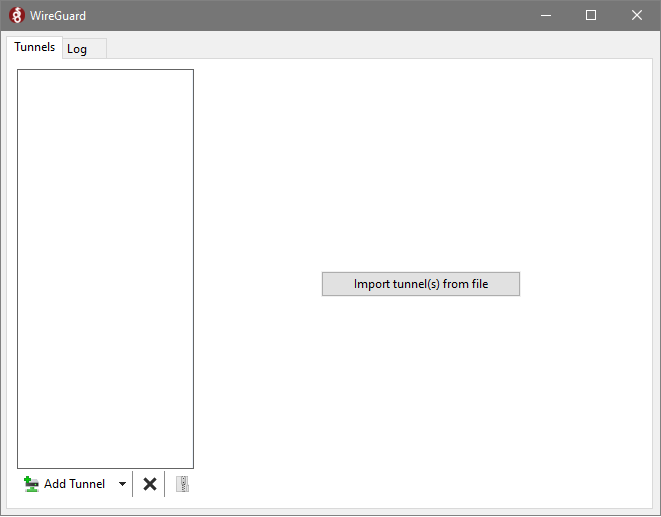
Click to “Add Tunnel” and then “Add empty tunnel”. “Create new tunnel” window appears;
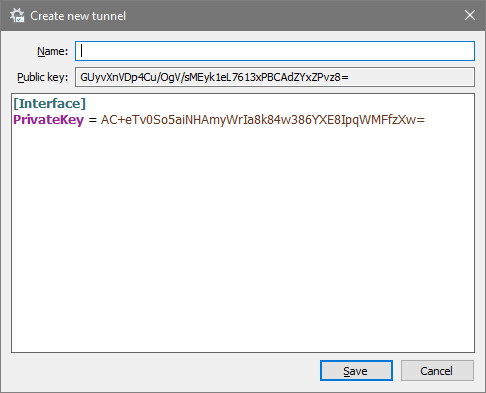
There it is! The Public Key’s there, auto-generated by WireGuard (alongside Private Key) each time you create a tunnel file. That’s the key we mentioned at “wgpeer” line above. (GUyvXnVDp4Cu/OgV/sMEyk1eL7613xPBCAdZYxZPvz8=)
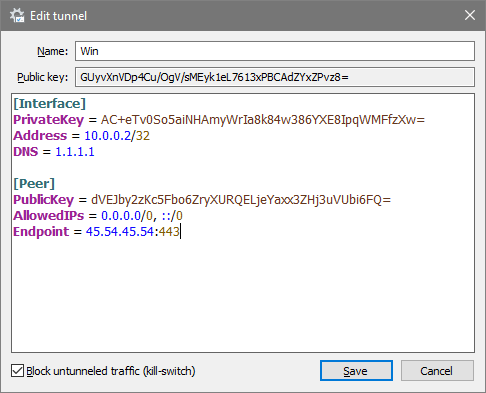
Give your new tunnel a name and save it. Then it will appear under “Tunnels” tab. Right-click on it, “Edit selected tunnel..” then add the following lines:
Under [Interface] tab, under “PrivateKey” line, add;
Address = 10.0.0.2/32
DNS = 1.1.1.1
10.0.0.2 is, as we defined in hostname.wg0 file, our Windows client’s *local* VPN IP address. DNS is of your choice. I prefer Cloudflare’s one, which is quite fast.
And add as Peer (our server’s VPN details), the following lines (make sure to replace Endpoint IP which belongs to my test VPS, with your server’s public IP);
[Peer]
PublicKey = dVEJby2zKc5Fbo6ZryXURQELjeYaxx3ZHj3uVUbi6FQ=
AllowedIPs = 0.0.0.0/0, ::/0
Endpoint = 45.54.45.54:443
PublicKey is the public key of the OpenBSD VPN server, but how did we get it? When wg interface has a private key set with “wgkey” in /etc/hostname.wg0 file, the corresponding public key is shown in the status output of the interface as “wgpubkey“, that needs to be configured at client’s side. Like so:
obsdvpnbox# ifconfig wg0
wg0: flags=80c3<UP,BROADCAST,RUNNING,NOARP,MULTICAST> mtu 1420
wgpubkey dVEJby2zKc5Fbo6ZryXURQELjeYaxx3ZHj3uVUbi6FQ=
and of course, these lines appear only if you’re root. Otherwise, ifconfig won’t show it.
So that: dVEJby2zKc5Fbo6ZryXURQELjeYaxx3ZHj3uVUbi6FQ= is the key that will be set as “PublicKey” of your server/peer, within WireGuard client on Windows, under [Peer].
And “Endpoint” line has our VPN server’s external public Internet IP address with the port we set before; 443.
The final configuration should be similar to:
Back to OpenBSD:
Now, back to our server, for our security, make sure the permissions for /etc/hostname.wg0 are correct. (only the root user and those in the group wheel should access/read the keys)
chmod 640 /etc/hostname.wg0
chown root:wheel /etc/hostname.wg0
Edit /etc/sysctl.conf file and add:
net.inet.ip.forwarding=1
This will allow packets to move between the WireGuard interface and the egress interface.
Now, the server needs to NAT the Client’s outgoing traffic, those outgoing packets to its external IP, forward tunneled traffic from the client to the Internet. We’ll achieve that by PF (otherwise Windows client will not be able to connect to Internet).
Edit /etc/pf.conf file and add the following line into an upper place possible, after the first “pass”:
match out on egress from wg0:network to any nat-to egress
“egress” as we know, includes all interfaces -within the route-. If you’d like to state a specific NIC interface, you can do it like, e.g.;
match out on vio0 from wg0:network to any nat-to vio0
My test VPS has pf.conf like:
obsdvpnbox# cat /etc/pf.conf
set skip on lo

block return    # block stateless traffic
pass            # establish keep-state

match out on egress from wg0:network to any nat-to egress

# By default, do not permit remote connections to X11
block return in on ! lo0 proto tcp to port 6000:6010

# Port build user does not need network
block return out log proto {tcp udp} user _pbuild
And now, after a reboot, OpenBSD will bring up the WireGuard interface&endpoint automatically.
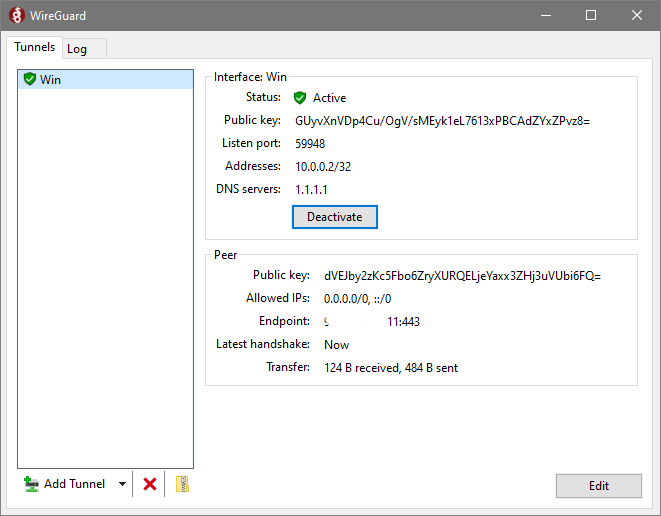
After the server is back, we move to Windows client and click to “Activate”. Tada! We’re now connected!
Pinging OpenBSD VPN server’s *local* IP from Windows;
C:\Users\ozguro>ping 10.0.0.1

Pinging 10.0.0.1 with 32 bytes of data:
Reply from 10.0.0.1: bytes=32 time=25ms TTL=255
Reply from 10.0.0.1: bytes=32 time=34ms TTL=255
Reply from 10.0.0.1: bytes=32 time=27ms TTL=255
Reply from 10.0.0.1: bytes=32 time=39ms TTL=255

Ping statistics for 10.0.0.1:
    Packets: Sent = 4, Received = 4, Lost = 0 (0% loss),
Approximate round trip times in milli-seconds:
    Minimum = 25ms, Maximum = 39ms, Average = 27ms

C:\Users\ozguro>
All done.
Once you are connected, I’d highly recommend you to visit dnsleaktest.com to see if your is DNS “leaking” (using a different DNS provider outside of your VPN), and if your IP Address differs (than your regular one). It should!
Test the DNS Leak with WireGuard VPN active&inactive (clear your browser’s cache each time), and compare the results.
Post Scriptum:
On Windows, within tunnel configuration file, you might wish to add under [Peer] if you’re behind a NAT and want the connection to be kept alive:
PersistentKeepalive = 25
That’s all for today, folks.
Thank you for reading, feedbacks and critical comments are much welcome!
Merry Christmas,
Özgür.
6 Comments
Thank you for the great tutorial. I have two questions, please excuse my ignorance:
1. Does this setup keep a log of VPN activity in the server? If so, how can it be disabled?
2. What is the best and easiest way to get Windows 10 Enterprise LTSC?
Hello there,
Many thanks for your comment! Nope, it is not an “ignorance” anymore, if you ask and try to learn! Thumbs up! 😉
1- No logging – unless you got “debug” enabled on the wgX interface. Still, it’d be safer to check the dmesg and /var/log/messages and PF logs. Perhaps, for the sake of a further privacy, you might wish to implement WireGuard on an OpenBSD box with Full Disk Encryption through OpenBSD’s softraid; https://www.openbsd.org/faq/faq14.html#softraidFDE
2- Just a friendly reminder; it isn’t mandatory to have Windows “LTSC” for such purpose – This was just a cosmetic preference of mine. But still, in case of any need, please check for the file titled: “en_windows_10_enterprise_ltsc_2019_x64_dvd_5795bb03.iso” under the link “File Archive (Random)” here.
That’s an untouched MSDN ISO image, matching the original MD5/SHA1 sums reported as follows;
VLSC Name: SW_DVD5_WIN_ENT_LTSC_2019_64BIT_English_-2_MLF_X22-05056.ISO
MSDN Name: en_windows_10_enterprise_ltsc_2019_x64_dvd_5795bb03.iso
CRC-32:
D68A78C3
MD5:
1067BE5346FED207089B3022165B8B19
SHA-1:
615A77ECD40E82D5D69DC9DA5C6A6E1265F88E28
Best,
Özgür.
Thanks for your quick response! Yes, my VPS contains an encrypted OpenBSD 6.9 installation, which has an email server via OpenSMTP and now a Wireguard server 🤗. Setting up wireguard was very straightforward, thanks to your tutorial, I did add optional preshared key between peers just as an additional security measure. It took me a while to figure out how to implement it, but just adding a wgpsk field followed by the key itself to the line that defines the peer on each machine’s hostname.wg0 file did the trick. It may be something to consider for adding to your tutorial if you wish. You see, when you don’t have a computer education background, you get more paranoid about missing something and messing things up 😊. I was using an openVPN server before, mainly for my cell phone (android), which needed an app to make it work since the native VPN settings in android somehow wouldn’t, but since switching to wireguard (n=1 day, lol) I feel like the battery drain improved quite a bit👍🏼.
Thank you so much for the link to the iso file! I will definitely give it a try. It feels like it is an uphill battle with propriety software, and even with some versions of linux, these days to maintain sanity in your installation, but your solution sounds like a good idea in that struggle.
Hello again,
I have been using this setup successfully for 3 years with my android cell phone being one of the peers. However, after today’s syspatch on OpenBSD 7.5, my phone no longer has internet when connected to wireguard. I have made no changes in the working configuration, and I know it is not pf, since disabling it altogether does not solve the issue. My phone’s wireguard interface reports no received packets. sysctl on the vps/server confirms net.inet.ip.forwarding=1. I rebooted the server and phone multiple times with no change in behavior. I would appreciate any help you may provide.
Never mind my previous comment and feel free to delete it as well as this one. It turned out to be due to a syntax error in pf.conf leading to pf rules not being loaded/enabled, disabling whole setup. I am sorry for spamming your blog.
Oh, no problem, glad you got the issue resolved, usually when there is a syntax error in pf.conf we see a prominent warning message when the system is booting. Anyways, have a wonderful weekend!